Showing posts with label exterior maintenance. Show all posts
Showing posts with label exterior maintenance. Show all posts
Monday, August 29, 2016
Board meeting minutes
The minutes of the Aug. 25, 2016 Board of Directors meeting can be found here:
http://grobbel.org/condo/08-25-2016_BoD_mtg_minutes.pdf


Thursday, December 4, 2014
How to winterize your outside faucets
Residents of the Manors are responsible for shutting off the
water to their outside faucets and draining the water from the lines so that
they do not freeze. Failure to do so
might result in freezing that causes the water line to burst and/or the faucet
to be damaged. The co-owner is responsible for the cost of repairs and any
resulting flood damage in their basement.
Some units at the Manors have two outside faucets (also called a hose bibb), one in the rear and one in the front or inside the garage. The photo above shows the typical location of the shut-off valve for the outside faucets on all units at the Manors It is located in the basement ceiling just inside of the faucet. Since the units at the Manors do not have "frost-free" outside faucets, it is crucial that they be winterized every fall.
The following video shows how to winterize your outside faucet. Use the reverse process to turn the water back on in the spring.
 |
| (click image to enlarge) |
The following video shows how to winterize your outside faucet. Use the reverse process to turn the water back on in the spring.
Monday, June 2, 2014
New light bulbs were installed today
The new light bulbs were installed in all of the exterior garage light fixtures today at Units 16 through 167.
Friday, May 10, 2013
Tilt feature on your double-hung windows

Simply raise the lower sash and use your window's tilt feature to clean the outside glass surface from inside your house.
Click here for photos and instructions on how to properly use the tilt latches and security locks on your double-hung windows.
Thursday, March 1, 2012
Brick repair work on 23 Units
 |
| Typical cracking in mortar and bricks (click to enlarge) |
In April 2011, the Board brought in a different contractor, Joe's Quality Home Improvements, to inspect the failing brickwork and offer their recommendations. They identified the root cause of these failures to be improperly-located flashing, which has caused weakening of the mortar bond between the adjacent courses of bricks, thus allowing stress cracks to be induced in both the mortar and the bricks themselves. The Board then asked the contractor to provide a cost estimate to repair the brickwork on those Units that they judged to be in the worst shape.
Rather than immediately perform the repairs on all 24 Units that were identified, the Board authorized them to repair one of the worst, which happened to be Unit 72. They made the recommended repairs later that month and 10 months later there has been no further cracking observed on that Unit. Therefore, at the Feb. 22, 2012 meeting of the Association's Board of Directors, the Board authorized Joe's Quality Home Improvements to make repairs to the remaining 23 Units using their recommended methods.
UPDATE: On March 1, 2012, the Board authorized the addition of three more units to this project, which are indicated below with an asterisk (*).
Co-owners of each affected Unit will receive a letter from our contractor with the next day or two, indicating whether the repairs on their Unit's brick work will take place during the week of March 5th or March 12th. Until the repairs are completed on your Unit, please have your vehicles parked on the street by 7:00 AM each morning of your assigned week.
The Board realizes that this repair work will pose a temporary inconvenience and we appreciate your cooperation while our contractor makes these necessary repairs.
Below is a list of the Units that are scheduled to be repaired over the next two weeks. They were judged by the contractor to be those in the most immediate need of repair and they tend to be those with the arched sill. Please note that when the contractor is finished with this list, we will have repaired slightly more than half of all our garages with brick walls over the garage door.
Hopefully, next year we will be able to budget enough money to make the brick repairs on the remaining units.
Lexington Ave East
50098 - Unit 71
50078 - Unit 73
50030 - Unit 76
49966 - Unit 80 *
49950 - Unit 81
49981 - Unit 84
50109 - Unit 92
50125 - Unit 93
50141 - Unit 94
Lexington Ave North
6731 - Unit 61
6749 - Unit 62
6807 - Unit 65
6829 - Unit 66
North Central Park
6755 - Unit 32
6883 - Unit 24
6947 - Unit 20
6979 - Unit 18
Regent
49979 - Unit 139 *
50043 - Unit 143
50059 - Unit 144
50107 - Unit 147
Lexington Ave South
6980 - Unit 167
6892 - Unit 163
6876 - Unit 162
6828 - Unit 159
Watling
49960 - Unit 107 *
Wednesday, September 7, 2011
Exterior garage lights
The other night I counted about 20 exterior garage light fixtures that were dark so the next day I purchased some more 40 watt incandescent replacement bulbs on behalf of the condo association. Tonight I inspected each of the dark fixtures and found that 15 of them had burned-out bulbs (6 of these were compact fluorescent bulbs, which makes one wonder about the claims for their superior longevity). The remaining dark bulbs had been partially unscrewed and I twisted them fully into their socket so that they are providing light again.
The condo association is responsible for the maintenance of the exterior garage lights and their photocell switches while the co-owners are responsible for providing the electricity to light the bulbs. The light from the exterior garage fixtures enables emergency responders and your own visitors to quickly and easily find your address at night and they also serve as a deterrent to vandalism. Keeping the bulb in your garage light fixture completely screwed-in not only helps keep the Manors safe and well-lit, it also assists the Association in identifying photocell switch failures so they can be repaired.
We have already experienced a half-dozen or so photocell switch failures and the only way for the Association to identify them is when bulbs are known to be good and completely screwed into their base. Tonight's inspection and maintenance showed that none of the fixtures were dark because of a photocell switch failure in the "off" state. The photocell switches can also fail in the "on" state and they are easier to detect because they no longer turn the current on and off at the right time. If you notice that your exterior garage light is burning during the daytime, please contact me and I will arrange to have the photocell switch replaced.
UPDATE - why not install compact fluorescent (CFL) instead of incandescent light bulbs?
The Association is installing long-life (2,000 hours), 40 watt incandescent bulbs that cost 60 cents each and which put out 455 lumens of light. Using the DTE residential billing rate from my last bill, I calculate that it costs me $2.12 per year to keep a 40 watt bulb light burning for the 12 month average of 12 hours per night. For $1.80 I can purchase a compact fluorescent light (CFL) bulb that is rated at 8,000 hours life, 13 watts and 450 lumens. The CFL will use only one-third the energy of that 40 watt incandescent bulb, which means that a CFL will save me about $1.40 per year in electricity costs. Since it will last longer than the incandescent bulb, I also need to compare the bulb purchase and replacement costs to estimate the total savings.
If the CFL actually lasts for the 8,000 hours rated life, then over a two-year period we would use (1) CFL versus (4) incandescent bulbs. At $1.80 versus ($0.60 x 4 = $2.40), the CFL purchase savings over two years is about $0.60. When you add that to the $2.80 savings in electricity over two years, I estimate that using a CFL bulb will at most save a grand total of $3.40, or $1.70 per year.
However, based on what I'm seeing here in the Manors, I don't believe that the CFL bulbs in the exterior garage lights are lasting anywhere near the rated 8,000 hours (about two years) because of having to operate in the cold temperatures during the winter. If I assume that they last only 4,000 hours (about one year), the grand total savings over two years is only about $1.60, or 80 cents per year (because the CFL bulb replacement costs are now higher, the savings is all in electricity usage).
Therefore, based on my analysis I believe that:
a) the Association's bulb replacement costs over a two year period is about the same or even slightly lower if we use 40 watt incandescent bulbs instead of 13 watt CFL bulbs
b) the co-owner's cost for the additional electricity to burn a 40 watt bulb over that two-year period is at most $2.80
c) until either the CFL purchase cost comes down and/or their outdoor life expectancy improves, the Association will purchase 40 watt incandescent bulbs for the exterior garage light fixtures.
The condo association is responsible for the maintenance of the exterior garage lights and their photocell switches while the co-owners are responsible for providing the electricity to light the bulbs. The light from the exterior garage fixtures enables emergency responders and your own visitors to quickly and easily find your address at night and they also serve as a deterrent to vandalism. Keeping the bulb in your garage light fixture completely screwed-in not only helps keep the Manors safe and well-lit, it also assists the Association in identifying photocell switch failures so they can be repaired.
We have already experienced a half-dozen or so photocell switch failures and the only way for the Association to identify them is when bulbs are known to be good and completely screwed into their base. Tonight's inspection and maintenance showed that none of the fixtures were dark because of a photocell switch failure in the "off" state. The photocell switches can also fail in the "on" state and they are easier to detect because they no longer turn the current on and off at the right time. If you notice that your exterior garage light is burning during the daytime, please contact me and I will arrange to have the photocell switch replaced.
UPDATE - why not install compact fluorescent (CFL) instead of incandescent light bulbs?
The Association is installing long-life (2,000 hours), 40 watt incandescent bulbs that cost 60 cents each and which put out 455 lumens of light. Using the DTE residential billing rate from my last bill, I calculate that it costs me $2.12 per year to keep a 40 watt bulb light burning for the 12 month average of 12 hours per night. For $1.80 I can purchase a compact fluorescent light (CFL) bulb that is rated at 8,000 hours life, 13 watts and 450 lumens. The CFL will use only one-third the energy of that 40 watt incandescent bulb, which means that a CFL will save me about $1.40 per year in electricity costs. Since it will last longer than the incandescent bulb, I also need to compare the bulb purchase and replacement costs to estimate the total savings.
If the CFL actually lasts for the 8,000 hours rated life, then over a two-year period we would use (1) CFL versus (4) incandescent bulbs. At $1.80 versus ($0.60 x 4 = $2.40), the CFL purchase savings over two years is about $0.60. When you add that to the $2.80 savings in electricity over two years, I estimate that using a CFL bulb will at most save a grand total of $3.40, or $1.70 per year.
However, based on what I'm seeing here in the Manors, I don't believe that the CFL bulbs in the exterior garage lights are lasting anywhere near the rated 8,000 hours (about two years) because of having to operate in the cold temperatures during the winter. If I assume that they last only 4,000 hours (about one year), the grand total savings over two years is only about $1.60, or 80 cents per year (because the CFL bulb replacement costs are now higher, the savings is all in electricity usage).
Therefore, based on my analysis I believe that:
a) the Association's bulb replacement costs over a two year period is about the same or even slightly lower if we use 40 watt incandescent bulbs instead of 13 watt CFL bulbs
b) the co-owner's cost for the additional electricity to burn a 40 watt bulb over that two-year period is at most $2.80
c) until either the CFL purchase cost comes down and/or their outdoor life expectancy improves, the Association will purchase 40 watt incandescent bulbs for the exterior garage light fixtures.
Monday, May 2, 2011
Phase 2 of the Exterior Paint Project is Set to Begin
U&S Painting will be starting work on Phase 2 of our exterior painting project sometime next week, weather permitting. Their first steps will be to powerwash the surfaces to be painted (update: this work started on May 7th), make necessary caulking repairs and replace and prime all dry-rotted trim boards. Then they will begin the painting of the exterior trim, garage doors and front doors. The painting work will probably take all month and perhaps into June. You will be notified in advance of when they plan to paint your front door. Per their advice, I am keeping with the same color for the front doors, since a lighter color will only lower the surface temperature by 10 or 15 degrees when the sun is shining directly on it through a storm door window.
As a reminder, your 2nd and final payment for the exterior painting “Additional Assessment” is due on June 1, 2011. If you have not already done so, please remit your payment of $420 along with the 2nd payment coupon you received a year ago.
After the painting work is complete, we will have new mulch installed throughout the common elements.
As a reminder, your 2nd and final payment for the exterior painting “Additional Assessment” is due on June 1, 2011. If you have not already done so, please remit your payment of $420 along with the 2nd payment coupon you received a year ago.
If you are unable to find your 2nd coupon, please remit your Additional Assessment payment as follows:
a) add the $420 to the regular $175 amount when you mail in your June 2011 monthly Condo Association dues. It will automatically be credited to your Additional Assessment.
b) If you’ve already sent in your June dues payment or if your dues is automatically withdrawn from your bank account, mail a check for $420 directly to Kramer-Triad’s office at 320 E. Big Beaver, Suite 190, Troy, MI 48083. Include a note listing your name, address and the words "Manors at Central Park Condo Association Additional Assessment payment" so that it will be properly credited.
Additional Assessment payments received after June 30, 2011 will be subject to a $25 late fee.
Click here to view a list of the Units that will be painted in Phase 2 (the units painted in last year's Phase 1 are listed here).After the painting work is complete, we will have new mulch installed throughout the common elements.
Friday, April 1, 2011
Winter's finally over - I hope!
It's been a long, cold and snowy winter! Now that the weather has warmed up - somewhat - I've been out and about assessing some of the snow-removal damage which you may have also noticed.
- I've found (4) broken sprinkler heads that will need replacement. Let me know if you spot any other broken heads that are not already marked with a green flag.
- I also tried replacing many of the pieces of turf that had been peeled back by the snowplow blades. If they don't green-up, the patches will be either seeded or sodded once we have the irrigation system turned on for the season.
- One of the "no-parking" sign posts on Lexington South was hit by the snow removal equipment and will need to be replaced.
- Numerous garage doors were scraped and dented by their pick-up snowplow driver. Instead of manually clearing the strip in front of the garage door, apparently the driver tried to drop the blade right next to the door but didn't allow for the pivoting motion and as a result he scraped and dented many of our doors.
- I agreed to replace the broken sprinkler heads so that I know the replacements will be the same brand as the others and that they will be installed slightly below grade so they won't be damaged again next year.
- I will provide him with the one-gallon can of exterior paint that our exterior painting contractor left with me last summer just for this sort of need. He will use it to paint the damaged/replaced portions of doors which were just painted last summer as part of the Phase 1 painting project. He will have all of the other doors repaired on Phase 2 units prior to the start of the Phase 2 exterior painting in May of this year.
Friday, January 28, 2011
Minutes of the Annual Meeting held on Jan. 19, 2011
Click here to read the unapproved minutes of the Annual Meeting.
Wednesday, May 19, 2010
Exterior Painting
Our exterior painting contractor began work this past Monday. Their first step is to identify, remove and replace all deteriorated wooden trim. These trim pieces have been marked with an orange paint stripe and they will be returning to remove them and install new trim pieces, which will then be painted with a primer before work begins on repainting the exterior of the affected units.
Removal and replacement of the deteriorated trim is a noisy task. Please bear with us while this vital work is performed.
The first 46 Units on this list will be painted this summer. The contractor will decide the actual order in which they will be completed. The contractor will return next year to work on the 47th through 105th Units on that list.
Removal and replacement of the deteriorated trim is a noisy task. Please bear with us while this vital work is performed.
The first 46 Units on this list will be painted this summer. The contractor will decide the actual order in which they will be completed. The contractor will return next year to work on the 47th through 105th Units on that list.
Saturday, April 24, 2010
Additional Assessment
The Additional Assessment for exterior painting that I mentioned in the April 2010 Newsletter was approved this past week by the Board of Directors of the Manors at Central Park Condo Association. Co-owners of Units 16 and higher will soon receive a letter from our Managing Agent (Associa Kramer-Triad) with full details on how to make your payment.
The exterior painting contract was awarded to U&S Painting, which plans to begin work during the second half of May. They will be painting 46 units this year and the remainder during 2011. The initial 46 units were all originally painted during 2004, while the remainder were painted in 2005, 2006 and 2007. Click here to view a web page that lists all units in the order that they were initially painted.
The Additional Assessment also provides funding for the application of landscaping mulch throughout the condominium common element areas. The contractor plans to do this work within the next seven to ten days.
The exterior painting contract was awarded to U&S Painting, which plans to begin work during the second half of May. They will be painting 46 units this year and the remainder during 2011. The initial 46 units were all originally painted during 2004, while the remainder were painted in 2005, 2006 and 2007. Click here to view a web page that lists all units in the order that they were initially painted.
The Additional Assessment also provides funding for the application of landscaping mulch throughout the condominium common element areas. The contractor plans to do this work within the next seven to ten days.
Thursday, April 16, 2009
Sewer Repairs
The faintly familiar sounds of heavy construction equipment echoed across the northwest portion of the Manors this afternoon. Unfortunately, it was not the welcome noise emanating from new construction work.
A sewer line owned by the Condo Association was blocked, causing the waste water from Units 55 & 56 to back up into their basements. Repeated attempts to open the sewer with a power auger were unsuccessful and a video inspection revealed that a section of the sewer lead pipe was completely separated. Kramer-Triad received approval from the Board of Directors to hire Paul C. Scott & Sons Plumbing to excavate and fix the line as soon as possible to alleviate the problem.
Once the sewer line was uncovered at the bottom of a 10 ft deep hole, the cause of the problem became evident. The contractor who made the tie-in to the sewer lead when the basement was originally excavated in 2004 must have hit the lead with their backhoe and pulled it out of the rubber friction boot on the 10 inch sewer main. This single 6 inch sewer lead services both units and it had been pulled out about 18 inches from the boot. The situation went unnoticed because that end of the sewer lead remained covered with backfill. Ever since the units were sold in 2005, all of the sanitary waste from Units 55 & 56 has had to flow through this 18 inch long tunnel in the sand in order to reach the sewer main. Eventually this tunnel collapsed and the sewer lead filled with sand. It's a wonder that this problem did not surface much sooner and that a sink hole never developed in the front lawn.

"Men at work" on Lexington North.

Workers excavated an 8 ft. x 15 ft. hole that was 10 ft. deep.

The worker in the hole is standing on top of where the sewer lead should have been connected to the sewer main; the manhole structure is at his side.

The section of sewer pipe between the two black Fernco flexible couplings is the permanent repair and it bridges the gap apparently created by the backhoe operator in 2004.
A sewer line owned by the Condo Association was blocked, causing the waste water from Units 55 & 56 to back up into their basements. Repeated attempts to open the sewer with a power auger were unsuccessful and a video inspection revealed that a section of the sewer lead pipe was completely separated. Kramer-Triad received approval from the Board of Directors to hire Paul C. Scott & Sons Plumbing to excavate and fix the line as soon as possible to alleviate the problem.
Once the sewer line was uncovered at the bottom of a 10 ft deep hole, the cause of the problem became evident. The contractor who made the tie-in to the sewer lead when the basement was originally excavated in 2004 must have hit the lead with their backhoe and pulled it out of the rubber friction boot on the 10 inch sewer main. This single 6 inch sewer lead services both units and it had been pulled out about 18 inches from the boot. The situation went unnoticed because that end of the sewer lead remained covered with backfill. Ever since the units were sold in 2005, all of the sanitary waste from Units 55 & 56 has had to flow through this 18 inch long tunnel in the sand in order to reach the sewer main. Eventually this tunnel collapsed and the sewer lead filled with sand. It's a wonder that this problem did not surface much sooner and that a sink hole never developed in the front lawn.

"Men at work" on Lexington North.

Workers excavated an 8 ft. x 15 ft. hole that was 10 ft. deep.

The worker in the hole is standing on top of where the sewer lead should have been connected to the sewer main; the manhole structure is at his side.

The section of sewer pipe between the two black Fernco flexible couplings is the permanent repair and it bridges the gap apparently created by the backhoe operator in 2004.
Wednesday, September 10, 2008
Volunteers needed for a work party
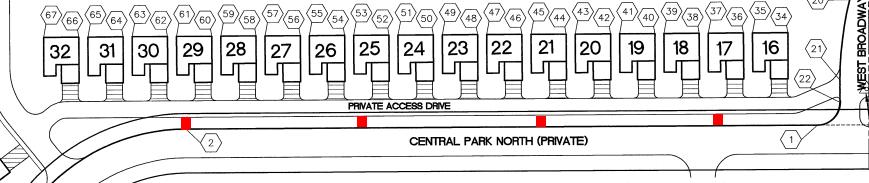
I'm looking for some volunteers who are willing to get their hands dirty with a project that needs to be completed before the snow flies. On Saturday Oct. 4th at 9:00 AM (rain date is the 5th), we will meet on the private access drive that parallels Central Park North. We will be installing concrete patio stones to create four walkways across the median that separates the access drive and Central Park North (the proposed walkways are shown in red on this drawing).
These walkways are necessary to provide a hard-surfaced path for Manors residents on Central Park North to use when setting out their trash during the winter. The Shelby Twp. waste collection contractor only picks up items placed at the curb of Central Park North and after the snow has been piled up by the plows, it can be impossible to safely climb over the frozen piles to get to the curb. We can have our snow removal contract stipulate that paths be kept cleared for use by these residents, but the contractor requires a marked, hard surface on which their crews can use their snow shovels and snow throwers.
The need for these walkways became very evident during last year's harsh winter. Since this project was not anticipated in our 2008 budget, the Board has approved expenditures for the materials, provided we volunteer the installation labor.
We will be installing (26) 1 ft. by 1 ft. concrete patio stones to create each of the 2 ft. wide walkways. We will first have to remove the sod and prepare a level, sandy base before we lay the stones, which weigh about 22 lbs apiece.
If you can help, please contact me by e-mail or phone (they are listed at the right side of the page). We will also need a couple of wheelbarrows and rakes. I will have the materials delivered in advance, so we will only have to move them from from the nearby drop-off point to their final positions.
These walkways are necessary to provide a hard-surfaced path for Manors residents on Central Park North to use when setting out their trash during the winter. The Shelby Twp. waste collection contractor only picks up items placed at the curb of Central Park North and after the snow has been piled up by the plows, it can be impossible to safely climb over the frozen piles to get to the curb. We can have our snow removal contract stipulate that paths be kept cleared for use by these residents, but the contractor requires a marked, hard surface on which their crews can use their snow shovels and snow throwers.
The need for these walkways became very evident during last year's harsh winter. Since this project was not anticipated in our 2008 budget, the Board has approved expenditures for the materials, provided we volunteer the installation labor.
We will be installing (26) 1 ft. by 1 ft. concrete patio stones to create each of the 2 ft. wide walkways. We will first have to remove the sod and prepare a level, sandy base before we lay the stones, which weigh about 22 lbs apiece.
If you can help, please contact me by e-mail or phone (they are listed at the right side of the page). We will also need a couple of wheelbarrows and rakes. I will have the materials delivered in advance, so we will only have to move them from from the nearby drop-off point to their final positions.
Thursday, May 29, 2008
Deck and Stamped Concrete Maintenance
I have updated this web page which has information regarding responsibilities for maintaining your deck and stamped concrete, plus information about the types of products available that will match their original, common appearances.
A link to that web page is located in the "Useful Links" section at right and will always take you to the latest version of that page.
On a related note, I have gathered information regarding the exterior paint colors that were originally used on all exterior wood trim and front entrance doors. While the Association is responsible for maintaining the exterior paint on our units, there may be circumstances where a co-owner wishes to touch up nicks or scratches or needs to paint something they have received approval to add or modify. Contact me and I can provide the information you will need to match the existing paint colors.
A link to that web page is located in the "Useful Links" section at right and will always take you to the latest version of that page.
On a related note, I have gathered information regarding the exterior paint colors that were originally used on all exterior wood trim and front entrance doors. While the Association is responsible for maintaining the exterior paint on our units, there may be circumstances where a co-owner wishes to touch up nicks or scratches or needs to paint something they have received approval to add or modify. Contact me and I can provide the information you will need to match the existing paint colors.
Subscribe to:
Posts (Atom)